A Deep Dive into Token-Based Authentication and OAuth 2.0 in MQTT

This article delves into additional authentication methods beyond those covered in previous articles.
Specifically, we will explore token-based authentication and OAuth 2.0, explaining their concepts and demonstrating their implementation in MQTT.
Token-Based Authentication
Let’s first look at token-based authentication and see some of the benefits over username and password authentication.
What is Token-Based Authentication?
As the name implies, token-based authentication uses tokens to authenticate a client instead of its credentials such as username and password. This is similar to an electronic key to a hotel room. You show your id to the receptionist and they give you an electronic key that allows you access to your room. This electronic key performs the function of a token for the duration of your stay. You don’t need to keep identifying yourself to the receptionist every time you want to enter the room, you just use your key.
An important feature of tokens is that they can have an expiration that limits how long they are valid. For instance, your hotel key would no longer be valid after your stay is over. But, you may check into a new hotel and get a different token for a room in the new hotel. Thus, tokens are much more flexible and easier to manage than usernames and passwords. The electronic key reader on the hotel room door does not have to keep track of valid usernames and passwords, it just needs to verify that the room number and expiration date on the electronic key are valid.
Next, we will look at some token-based authentication methods for MQTT.
Token-Based Authentication Method for MQTT
In MQTT, we usually use JWT to implement Token authentication.
JWT (JSON Web Token) is a compact way of authenticating clients in MQTT brokers. The client sends a signed JWT token to the broker, and the broker uses the token to authenticate the client. The broker does not need to maintain a list of client usernames and passwords.
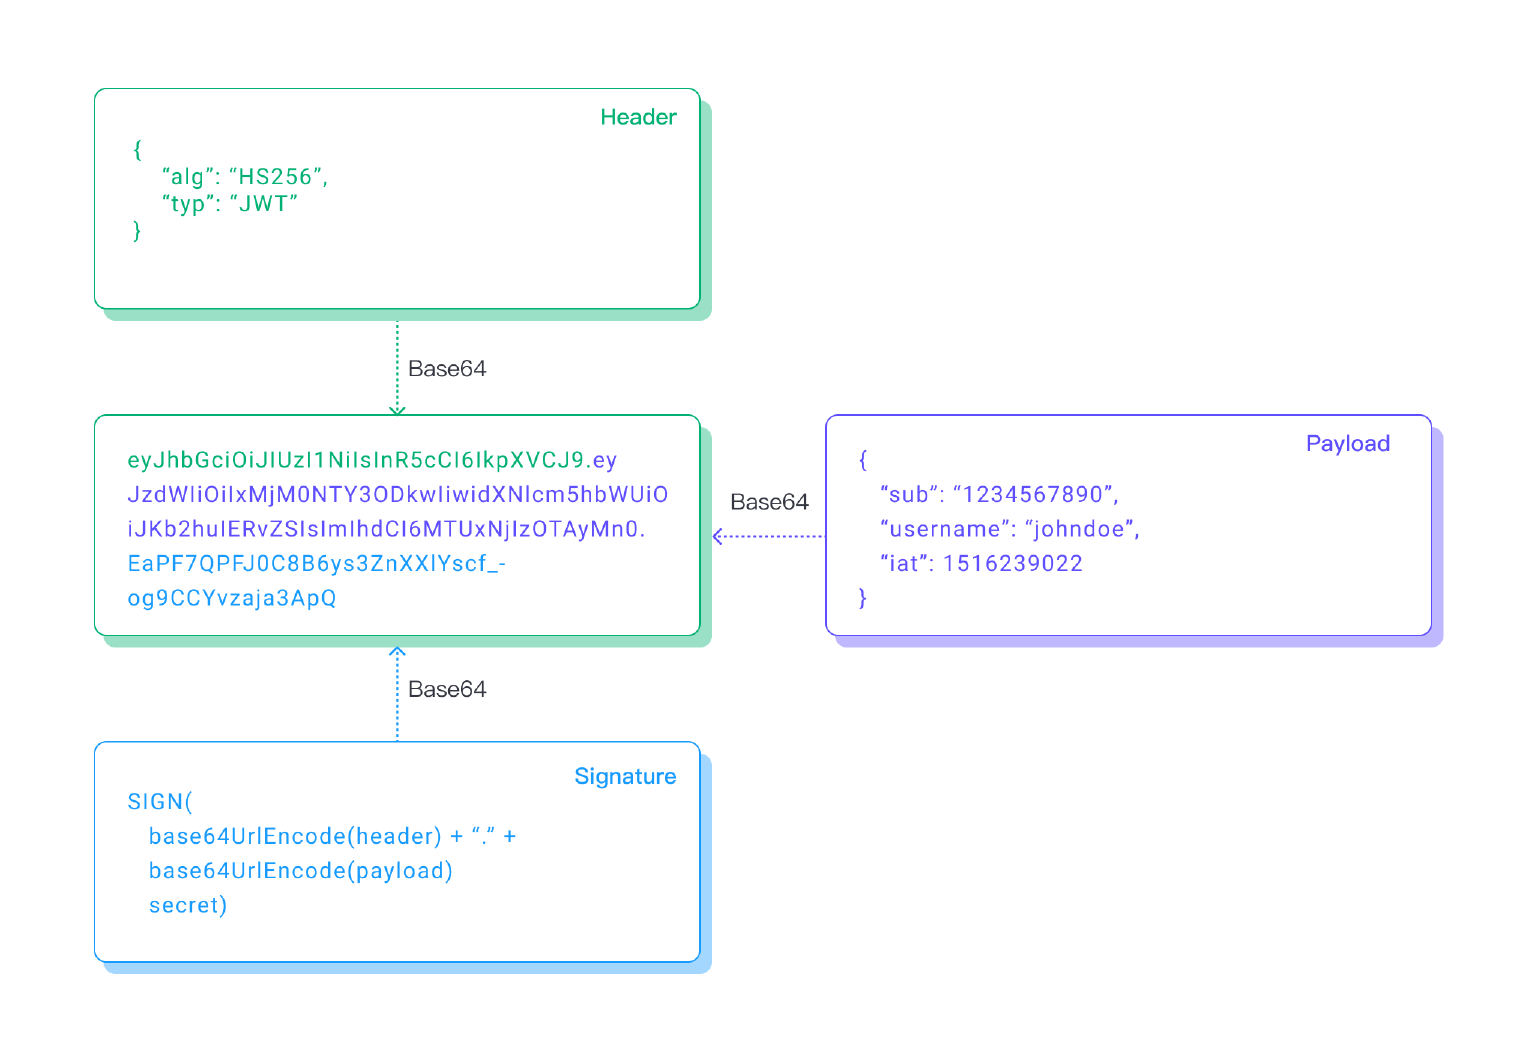
The JWT token consists of the following parts:
Header: Base64 encoded - Identifies which algorithm is used to generate the signature.
Payload: Base64 encoded - This contains the claims that can be used to authenticate the client.
Signature: Base64 encoding of the concatenation of the header and payload, all signed with a secret.
The following diagram shows the JWT structure:

Note that the header and payload are not encrypted, they are just encoded using the base64 binary-to-text encoding function. It is not a one-way function, so the contents can be read easily by using a base64 decoding function. So, make sure that the header and payload sections do not contain sensitive information. It is also a good idea to use TLS to encrypt the client connections. The JWT is signed using a secret.
The broker needs to verify that the JWT is valid. The broker either needs to know the secret, thus have a shared secret between the client and the broker, or the broker can use a JWKS (JSON Web Key Set). A JWKS is a set of public keys that are used to verify the secret key is valid. The broker can reference a JWKS endpoint rather than holding the keys itself.
When a JWT token is issued, it cannot be revoked until it expires. So, it is important to keep it stored in a safe location. If it is stolen, the attacker could use it to gain access to the broker.
An authentication server can be used to get the JWT token. In this case, the client connects to the authentication server, which verifies its identity and issues a JWT token to the client. The client uses this token to connect to the broker.
The following diagram shows this process:

The following shows an example JWT payload.
{
  "clientid": "client1",
  "username": "user1",
  "iat": 1516239022,
  "nbf": 1678114325,
  "exp": 1709649185
}
Besides the clientid and username fields, the JWT token can contain some time fields that indicate when the token is valid. The times shown are all in Unix time, which is the number of seconds since 1970-Jan-01.
“iat”: Issued at - The date and time the token was issued. Expressed in Unix time.
“nbf”: Not before - The date and time the token becomes valid. Expressed in Unix time.
“exp”: Expired - The date and time the token expires. Expressed in Unix time.
Note that by using the nbf field, you can issue a JWT that will not be valid until a future date.
OAuth 2.0
In the previous section, we discussed JWT which describes the format of the tokens; however, it does not dictate how the tokens are obtained. Next, let’s look at how OAuth 2.0 and JWT can be used together to allow clients access to the broker.
What is OAuth 2.0?
OAuth 2.0 is a framework that allows users to access resources using their credentials from a separate authentication and authorization server, such as Google, Facebook, GitHub, and many others. This can be used as a way of having an SSO (Single Sign On) mechanism because the user doesn’t have to remember multiple passwords. They can use the same Google credentials for different applications.
Originally OAuth 2.0 was designed to be an authorization framework to grant third-party applications a particular scope of access to recourses. A common example is read access to Gmail contacts. We allow the application to read our contacts, but we don’t want it to be able to delete them. One problem that OAuth 2.0 solves is that we can give the third-party application access to our contacts without having to give our Gmail password to the application which of course is not very secure.
Because it was also convenient to use this protocol for authentication, an extension to OAuth 2.0 called OpenID Connect was created. This created a standard way to use OAuth 2.0 for authentication. Since this article is about authentication, we are referring to OAuth 2.0 together with OpenID Connect as the mechanism to grant MQTT clients access to the broker.
How Does OAuth 2.0 Work With MQTT?
OAuth 2.0 and OpenID Connect can be used as a mechanism for the clients to retrieve the appropriate JWT, which can then be sent to the broker. Referring back to the above image, the first step is that the MQTT client requests the JWT token from the authentication server. We are now assuming that the authentication server supports OAuth 2.0 with the OpenID Connect extension. The OpenID Connect specifies that the token returned by the authentication server will be in the JWT format. Once the client receives the JWT, it can be sent to the broker. Usually, the JWT is sent to the broker in the password field of the CONNECT packet.
Summary
As the world’s leading MQTT broker, EMQX supports multiple authentication methods including JWT authentication. You can choose HMAC as your signature scheme, or the more secure RSA, or directly configure a JWKS endpoint for EMQX to enable JWT authentication.
By adopting these additional authentication approaches, you can strengthen your overall system's defenses against unauthorized access and potential security breaches. As technology continues to evolve, it becomes increasingly vital to stay up-to-date with the latest authentication techniques.