Using Terraform to Deploy EMQX MQTT Broker

Table of Contents
Introduction
Modern IoT applications require real-time and efficient communication protocols to manage the constant data flow between devices. One such protocol, MQTT (Message Queuing Telemetry Transport), has gained significant popularity in the IoT landscape due to its lightweight, low bandwidth, and high-performance capabilities.
This blog post will discuss deploying your MQTT infrastructure using EMQX - a highly scalable MQTT broker, and Terraform - an Infrastructure as Code (IaC) tool.
EMQX and Terraform
EMQX is an open-source distributed MQTT broker that provides robust and scalable messaging services. It can handle millions of concurrent MQTT connections and is optimized for performance, making it a perfect choice for IoT deployments.
Terraform is an IaC tool that defines, provides, and manages cloud infrastructure using a declarative language. By adopting Terraform in your MQTT deployments, you can:
Simplify infrastructure management
Ensure consistency across environments
Accelerate deployment times
Reduce manual errors
Enhance collaboration between team members
Standardize Deployment Workflow

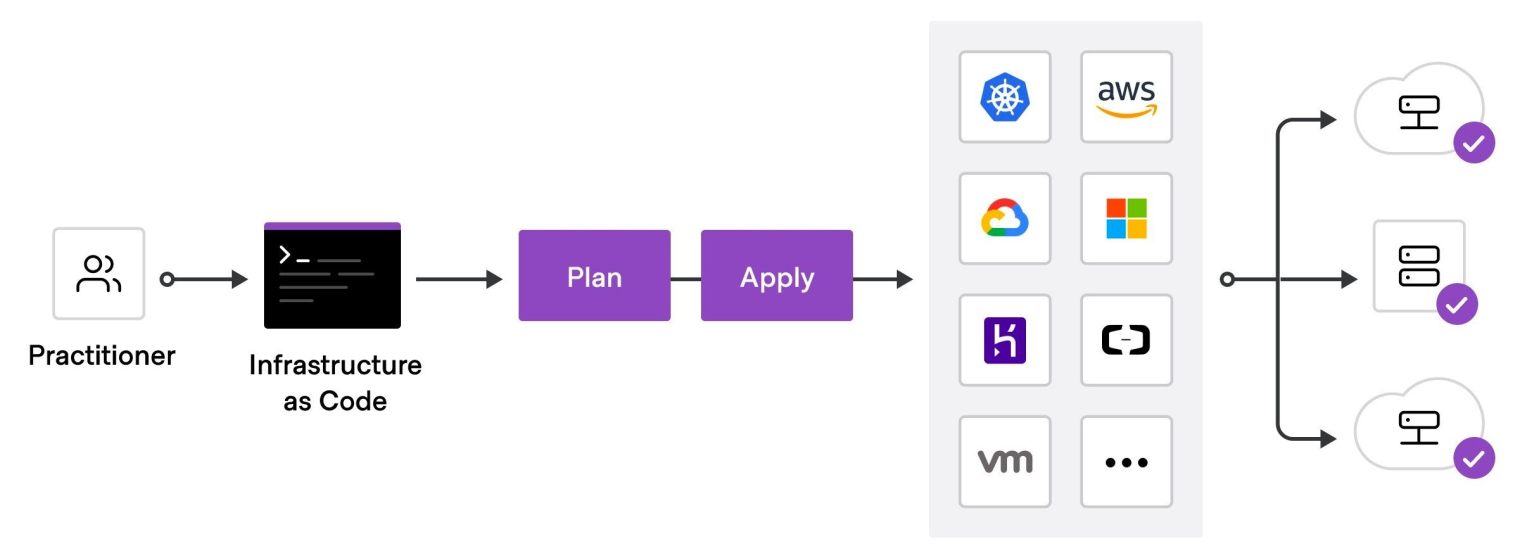
To deploy infrastructure with Terraform, you need to:
Scope - Identify the infrastructure for your project.
Author - Write the configuration for your infrastructure.
Initialize - Install the plugins Terraform needs to manage the infrastructure.
Plan - Preview the changes Terraform will make to match your configuration.
Apply - Make the planned changes.
Terraform Quick Start
Configuration
Terraform Provider Configuration
The Terraform core program requires at least one provider to build anything.
You can manually configure which version(s) of a provider you would like to use. If you leave this option out, Terraform will default to the latest available version of the provider.
terraform {
  required_providers {
    google = {
      source = "hashicorp/google"
      version = "4.51.0"
    }
  }
}

provider "google" {
  credentials = file("<NAME>.json")

  project = "<PROJECT-ID>"
  region  = "us-central1"
  zone    = "us-central1-c"
}
Resource and Dependency
Anatomy of a Resource
Every terraform resource is structured the same way.
resource type "name" {
  parameter1 = "foo"
  parameter2 = "bar"
  list = ["one", "two", "three"]
}
resource: Top level keyword
type: Type of resource. Example: google_compute_instance.
name: Arbitrary name to refer to this resource. Used internally by Terraform.
Terraform Data Sources
Data sources are a way of querying a provider to return an existing resource so that we can access its parameters for our use.
data "google_compute_image" "ubuntu" {
  family  = "ubuntu-2004-lts"
  project = "ubuntu-os-cloud"
}
Terraform Dependency Mapping
Terraform can automatically keep track of dependencies for you. Look at the two resources below.
# Create a VPC
resource "google_compute_network" "main" {
  name                    = "my-network"
  auto_create_subnetworks = false
}

# Create a subnet within the VPC
resource "google_compute_subnetwork" "main" {
  name          = "my-subnet"
  ip_cidr_range = "10.0.1.0/24"
  region        = "us-central1"
  network       = google_compute_network.main.self_link
}
In this example, we create a VPC network, a subnet within the network, and a firewall rule to allow SSH traffic. We refer to the VPC network in the google_compute_subnetwork and google_compute_firewall resources using the google_compute_network.main.self_link attribute, which contains the self-link URL of the google_compute_network resource.
Organize Code
Terraform will read any file in your workspace that ends in a .tf extension, but the convention is to have a main.tf, variables.tf, and outputs.tf. You may add more tf files if you wish.
main.tf
variables.tf
outputs.tf
Let's take a closer look at each of these files.
The Main File
The first file is called main.tf. This is where you normally store your terraform code. With a larger, more complex infrastructure, you might break this up across several files.
resource "google_compute_instance" "my-vm" {
  name         = "my-vm"
  machine_type = var.machine_type
  zone         = var.zone

  boot_disk {
    initialize_params {
      image = var.image
    }
  }

  network_interface {
    network = "default"
  }
}
The Variables File
The second file is called variables.tf. This is where you define your variables and optionally set some defaults.
variable "machine_type" {
  description = "Machine type for the virtual machine"
  default     = "n1-standard-1"
}

variable "zone" {
  description = "Zone for the virtual machine"
  default     = "us-central1-a"
}

variable "image" {
  description = "Boot image for the virtual machine"
  default     = "ubuntu-os-cloud/ubuntu-2004-lts"
}
The Outputs File
In the outputs file, you configure any messages or data you want to show at the end of a terraform application.
output "ip_address" {
  description = "IP address of the virtual machine"
  value       = google_compute_instance.my-vm.network_interface[0].access_config[0].nat_ip
}
Command Line
Terraform has subcommands that perform different actions.
# Basic Terraform Commands
terraform version
terraform help
terraform init
terraform plan
terraform apply
terraform destroy
Terraform Init
Terraform fetches any required providers and modules and stores them in the .terraform directory. If you add, change or update your modules or providers, you must run in it again.
Initializing the backend...

Initializing provider plugins...
- Reusing previous version of hashicorp/google from the dependency lock file
- Installing hashicorp/google v4.0.0...
- Installed hashicorp/google v4.0.0 (signed by HashiCorp)

Terraform has been successfully initialized!
Terraform Plan
Preview your changes with terraform plan before you apply them.
An execution plan has been generated and is shown below.
Resource actions are indicated with the following symbols:
  + create

Terraform will perform the following actions:

  # google_compute_instance.vm_instance will be created
  + resource "google_compute_instance" "my-vm" {
      ...
    }

Plan: 1 to add, 0 to change, 0 to destroy.
Terraform Apply
$ terraform apply
An execution plan has been generated and is shown below.
Terraform will perform the following actions:
  # aws_vpc.main will be created
  + resource "google_compute_instance" "my-vm" {
        ...
    }
Plan: 1 to add, 0 to change, 0 to destroy.
terraform apply runs a plan, and if you approve, it applies the changes.
Terraform Destroy
$ terraform destroy
An execution plan has been generated and is shown below.
Terraform will perform the following actions:
  # aws_vpc.main will be destroyed
  - resource "google_compute_instance" "my-v" {
         ...
    }
Plan: 0 to add, 0 to change, 1 to destroy.
terraform destroy does the opposite. If you approve, your infrastructure is destroyed.
How to deploy EMQX with Terraform
We’ll demonstrate how to deploy an EMQX node on GCP with Terraform as an example.
Step 0: Setting Up the GCP Environment
First, you need to create a project on GCP and enable the required APIs. Follow these steps:
Create a new project in the GCP Console
Enable the Compute Engine API and the Kubernetes Engine API
Create a Service Account with the "Editor" role and download the JSON key
Step 1: Set Up Your Terraform Configuration
Create a new directory for your Terraform project and navigate to it in your terminal:
$ mkdir emqx-gcp-terraform
$ cd emqx-gcp-terraform
Create a main.tf file in the project directory to hold your Terraform configuration.
Step 2: Define the GCP Provider
In the main.tf file, add the Google Cloud Platform provider block:
provider "google" {
  project = "<YOUR-GCP-PROJECT-ID>"
  region  = "us-central1"
  zone    = "us-central1-a"
}
Make sure to replace <YOUR-GCP-PROJECT-ID> with your actual GCP project ID.
Step 3: Configure EMQX MQTT Broker Infrastructure
Add the following code to your main.tf file to define the resources necessary for deploying the EMQX MQTT broker on GCP:
resource "google_compute_instance" "emqx" {
  name         = "emqx-mqtt-broker"
  machine_type = "e2-medium"

  boot_disk {
    initialize_params {
      image = "emqx-4-4-16" # Replace this with the latest EMQX broker image
    }
  }

  network_interface {
    network = "default"

    access_config {
      // Ephemeral external IP
    }
  }

  tags = ["emqx", "mqtt"]
}

resource "google_compute_firewall" "emqx" {
  name    = "emqx-firewall"
  network = "default"

  allow {
    protocol = "tcp"
    ports    = ["1883", "8083", "18083"]
  }

  source_ranges = ["0.0.0.0/0"]
  target_tags   = ["emqx"]
}
This configuration creates a GCP Compute Engine instance and a firewall rule that allows MQTT traffic on ports 1883, 8083, and 18083. Be sure to replace the image field with the latest EMQX broker image available on GCP.
Step 4: Deploy the Infrastructure
With your infrastructure defined, run the following commands to deploy the EMQX MQTT broker:
$ terraform init
$ terraform apply
Review the proposed changes, and type yes when prompted to proceed with the deployment.
Step 5: Connect to Your MQTT Broker
Once the deployment is complete, you'll receive the public IP address of the EMQX MQTT broker. You can now use an MQTT client or application to connect to the broker and start sending and receiving messages.
Conclusion
Combining EMQX and Terraform allows you to create a reliable, scalable, and easily manageable IoT messaging infrastructure. By adopting Infrastructure as Code practices with Terraform, you can streamline the deployment of your MQTT broker clusters, ultimately improving your team's productivity and your application's reliability.